Module 2 An introduction to VBA
This module gives a short introduction to VBA, so you can get started programming and run your code.
Learning path diagram
Click/hover the nodes to follow links and see details.
If you like a different learning style there is a lot for videos about VBA online such as course 14-Hour VBA Course. The videos have been pointed out as extra online supplements in the learning path diagram. However, they are not necessary for the course. Since Excel change as new versions arrive and it work on different operating systems, the look in the screenshots and videos might be a bit different from your version. However, you still should be able to understand it.
2.1 Learning outcomes
By the end of this module, you are expected to:
- Describe what VBA is.
- Setup Excel for VBA.
- Know how the macro recorder works.
- Make your first program.
- Have an overview over what VBA can do.
- Describe what a variable is.
- Name different data types and how they effect memory size.
- Declare a variable as a data type.
- Make a simple procedure.
- Do simple loops and conditional statements.
- Recorded you first macro using the macro recorder
The learning outcomes relate to the overall learning goals number 2 and 4 of the course.
2.2 What is VBA
Visual Basic for Applications (VBA) is an implementation of the BASIC programming language intended to control and automate Microsoft Office applications, developed by Microsoft. For instance, you can automatically create sheets, delete objects, create user-defined functions or read/write data to a sheet. It is not a standalone program, it can only run in the host application. In this course we will focus on running VBA from Excel. VBA is widely used in the industry (specially linked to Excel) and easy to learn. Microsoft stopped investing in VBA in 2008. It only update it for small changes. However, VBA is still a vital part of desktop Office applications, and will continue to be so in the future.
VBA is a compiled language implemented using compilers (translators that generate machine code from source code). That is, code need to be compiled first before running it. You can only run VBA using the desktop version of Excel. That is, you can’t create, run, or edit VBA in Excel for the web.
With VBA you can extend Excel and automate tasks by coding different algorithms that for instance can be run by pressing a button. Since VBA is a programming language, the initial learning curve is steeper compared to Excel. However, you will get started fast because you already know Excel.
2.3 Setup Excel for VBA
First, note that this course is taught in English. Hence it is strongly recommended that you change your language setting for Excel to English, so the menus and Excel functions are in English! On a mac () go to System settings > General > Language & Region and add English as primary language (press the + sign and add it). Note this will affect all your programs on your mac, since this is the way Apple do it. On windows (), select File > Options > Language in Excel and under Office display Language, make sure the display language is English.
Second, the VBA code editor does not work well with auto save turned on. That is, if you have a version of Excel with the option to turn auto save on/off then set it to off.
Third, for running VBA code you must trust the code in the macro enables Excel files (ending with .xlsm) you download. Hence if asked then trust the macros when opening the file. You may also change the security settings under Excels preferences.
Finally, For running VBA code the Developer tab needs to be visible in Excel. This can be done by check marking the Developer tab under the ‘Ribbon and Toolbar’ options in Excel. You add it by choosing Excel -> Preferences -> Ribbon and toolbar () or right click a tab and choose Customize ribbon … ().
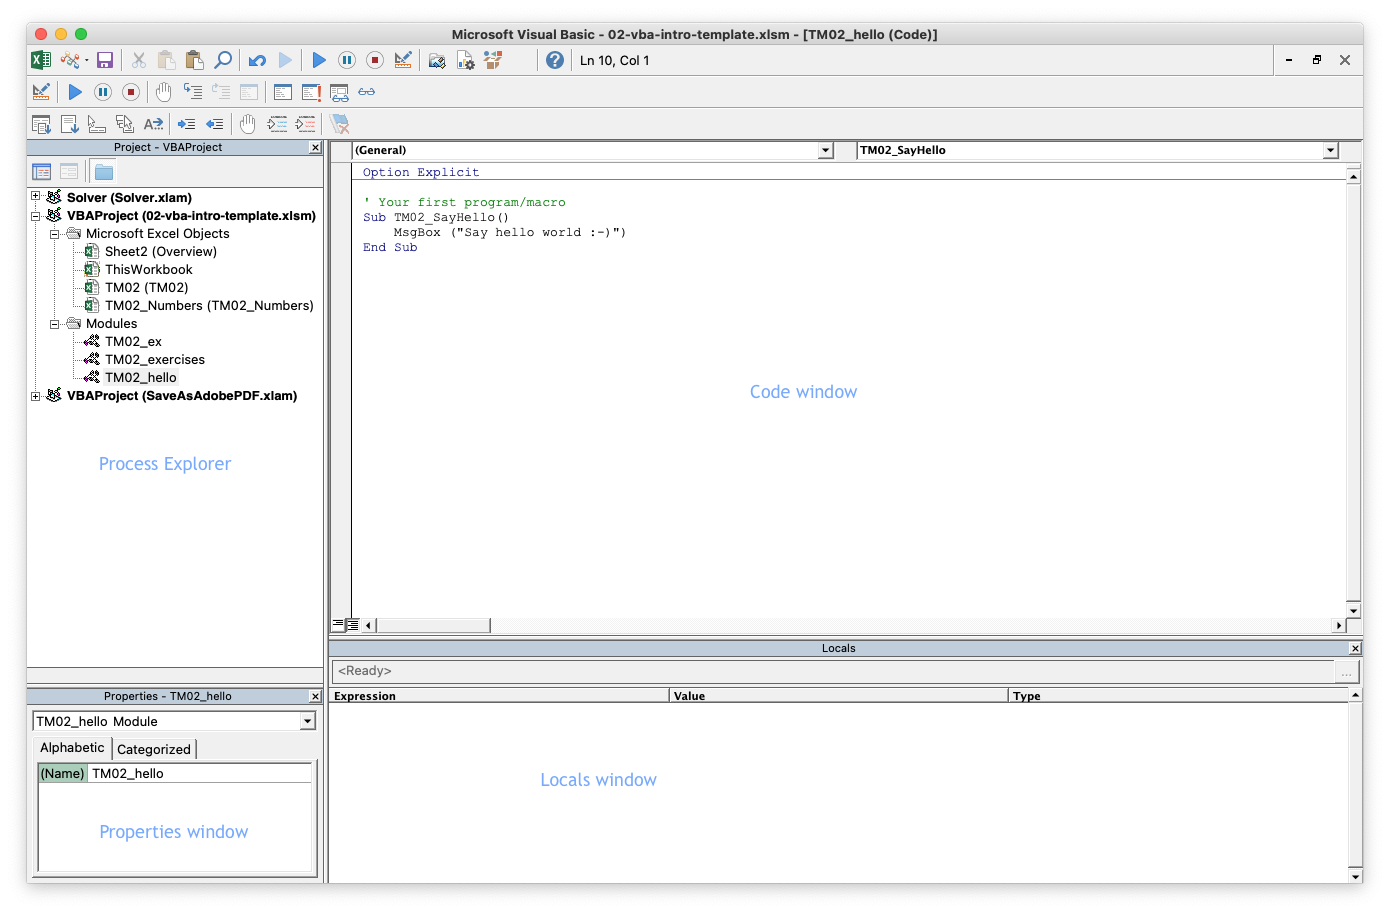
Figure 2.1: The VBA editor.
In the Developer tab you open the VBA editor by pressing the Visual basic button ( Alt + F11, ⌥ + F11). The VBA editor is where you write your VBA code. A screenshot of the VBA editor can be seen in Figure 2.1. You can setup the editor so it consists of a set of different sub-windows. Here we will highlight the ones you will use the most:
- Code: The code window is where you can see the code of your modules.
- Process Explorer: Gives you an overview over all your open workbooks (a Excel file) and the VBA modules (a place to write VBA code) inside each workbook.
- Properties: Each element in the Process Explorer can be seen as an object and each object has a set of properties. For instance a module have a property called
Namecontaining the name of the module. You can edit the name by modifying the field in the Properties window. Similar a worksheet has a set of properties (try selecting one of the sheets in the Process Explorer). - Locals: This is a window which can be used for debugging. During debugging you can run your code line by line by inserting breakpoints. You can then observe the values of your variables in the Locals window.
If you do not see the sub-windows in the editor. Then you can open them using the icons in the toolbar (hoover over the icons to find them). Finally, let us set the preferences for the VBA editor. Open the preferences/options Excel -> Preferences -> Editor () or Tools -> Options -> Editor (). Uncheck mark ‘Auto Syntax Check’ and check mark ‘Require Variable Declaration’.
2.4 Your first program
Let us try to make your first piece of code. Download the template file vba-template.xlsm, open the file and open the VBA editor under the Developer tab.
Add a new module by clicking the Insert Module icon (upper left corner - note you can hoover over the icons to see what they do).
Rename the module (named Module1) to TM2_hello (note you have to use underscores).
Open the module by double clicking on the module in the Process Explorer
Add the code
' Your first program/macro
Sub TM2_SayHello()
    MsgBox ("Say hello world :-)")
End Sub
The code is a procedure (sub) and since it does not have any input arguments it is called a macro and can be run directly. Note if a line starts with a
'then the line is considered as a comment and not used by the program.Run the macro by pressing the Play icon or using the shortcut F5. What happend?
Go to the worksheet TM2 in Excel.
- In the Developer tab press the Button icon and click on cell G3.
- In the popup window select macro name TM2_SayHello and click OK.
- Rename the button by clicking the text and call it ‘Say Hello’. Click besides the button to finish.
- Run the button by clicking it.
- Try right clicking the button and move/resize it.
Save the workbook (Excel file). Note the Excel file has extension
.xlsmand not.xlsxbecause it contains VBA code.
You have now finished your first program by saying hello to the world using a message box.
2.5 The macro recorder
It is possible to use the Macro recorder to turn your actions in Excel into VBA code. This can be particularly useful if you have forgotten the code for a specific color, the name of a function or need to plot a graph. Unfortunately, you cannot record if-statements or loops, so the recorder is not an easy way out of learning to code. But it is a handy tool for getting pieces of code.
Let us try to record a macro that make a scatter plot of cells D8:E12 and change the title:
- Click the Record Macro icon under under the Developer tab.
- Name the macro TM2_Plot and click OK (the recorder is now running).
- Go to the worksheet TM2 and select cells D8:E12.
- Add a scatter plot of the points.
- Rename the title to ‘A line’.
- Click the Stop Recording icon under under the Developer tab.
You have now finished recording your macro. Let us have a look at the code by going to the TM2_Plot sub in the VBA editor. You should have something similar to:
Sub TM2_Plot()
'
' TM2_Plot Macro
'
    Worksheets("TM2").Activate
    Range("D8:E12").Select
    ActiveSheet.Shapes.AddChart2(240, xlXYScatterSmooth).Select
    ActiveChart.SetSourceData Source:=Range("'TM2'!$D$8:$E$12")
    ActiveChart.ChartTitle.Select
    ActiveChart.ChartTitle.Select
    ActiveChart.ChartTitle.Text = "A line"
    Selection.Format.TextFrame2.TextRange.Characters.Text = "A line"
    With Selection.Format.TextFrame2.TextRange.Characters(1, 6).ParagraphFormat
        .TextDirection = msoTextDirectionLeftToRight
        .Alignment = msoAlignCenter
    End With
    With Selection.Format.TextFrame2.TextRange.Characters(1, 1).Font
        .BaselineOffset = 0
        .Bold = msoFalse
        .NameComplexScript = "+mn-cs"
        .NameFarEast = "+mn-ea"
        .Fill.Visible = msoTrue
        .Fill.ForeColor.RGB = RGB(89, 89, 89)
        .Fill.Transparency = 0
        .Fill.Solid
        .Size = 14
        .Italic = msoFalse
        .Kerning = 12
        .Name = "+mn-lt"
        .UnderlineStyle = msoNoUnderline
        .Spacing = 0
        .Strike = msoNoStrike
    End With
    With Selection.Format.TextFrame2.TextRange.Characters(2, 5).Font
        .BaselineOffset = 0
        .Bold = msoFalse
        .NameComplexScript = "+mn-cs"
        .NameFarEast = "+mn-ea"
        .Fill.Visible = msoTrue
        .Fill.ForeColor.RGB = RGB(89, 89, 89)
        .Fill.Transparency = 0
        .Fill.Solid
        .Size = 14
        .Italic = msoFalse
        .Kerning = 12
        .Name = "+mn-lt"
        .UnderlineStyle = msoNoUnderline
        .Spacing = 0
        .Strike = msoNoStrike
    End With
    ActiveChart.ChartArea.Select
End Sub
In general a recorded macro contains a lot of unnecessary code which can be removed. For instance, here we just want to make a scatter plot of cells D8:E12 and change the title. That is, the code can be reduced to:
' Add a scatter plot
Sub TM2_Plot()
    Worksheets("TM2").Activate
    Range("D8:E12").Select
    ActiveSheet.Shapes.AddChart2(240, xlXYScatterSmooth).Select
    ActiveChart.SetSourceData Source:=Range("'TM2'!$D$8:$E$12")
    ActiveChart.ChartTitle.Text = "A line"
End Sub
Which code to remove can sometimes be hard to realize. However, you may try to remove small parts of code, run the macro and check if the results still are as wanted.
Finally, try to add a button ‘Make plot’ that run the macro. Go to the worksheet TM2 and do steps:
- In the Developer tab press the Button icon and click on cell G8.
- In the popup window select macro name TM2_Plot and click OK.
- Rename the button by clicking the text and call it ‘Make plot’. Click besides the button to finish.
- Run the button by clicking it.
2.6 VBA - A short overview
Let us have a short overview over some VBA features so you can get started coding. Basic building blocks in programming are:
- Variables store stuff in memory.
- Procedures (functions and subs) execute a set of instructions.
- Input and output are needed to read data and output the result.
- Conditional statements are used to execute different instructions depending on a true/false value.
- Loops are used to execute code repeatedly.
2.6.1 Variables
Variables are used to store information that is saved in memory. You may visualize a variable as a box in memory (see Figure 2.2). The variable name can be seen as the label on the box.

Figure 2.2: Visualization of computer memory
The box can contain for instance a number, a date or a boolean. That is, any data type defined by VBA. Some of the basic data types used by VBA are:
| Name | Type | Details |
|---|---|---|
| Byte | Numerical | Whole number between 0 and 255. |
| Integer | Numerical | Whole number between -32768 and 32767. |
| Long | Numerical | Whole number between - 2147483648 and 2147483647. |
| Double | Numerical | Floating decimal number between -1.79769313486232E308 and 1.79769313486232E308. |
| String | Text | Text. |
| Date | Date | Date and time. |
| Boolean | Boolean | True or False. |
| Variant | Any type | Any kind of data (default type if the variable is not declared). |
All basic data types can be seen in the VBA documentation. Note that some data types are numericals, i.e. they represent a number (either an integer or a decimal number), other data types represent a set of characters (a string), a boolean or a date.
More advanced data types such as a group of numbers (a numeric array), a range of cells in a worksheet (an object) or a set of numbers (a collection) will be considered in Module 5.
Your memory contains a limited amount of storage and it is therefore important to use it wisely. The computer memory can be seen as a group of bits (zero and ones) and we can measure the memory size by counting the number of bits or bytes (8 bits = 1 byte). Different data types take up different amounts of memory. For example, the memory requirements for some of the basic data types are:
| Data type | Storage size |
|---|---|
| Byte | 1 byte |
| Boolean | 2 bytes |
| Integer | 2 bytes |
| Long (long integer) | 4 bytes |
| Double (double-precision floating-point) | 8 bytes |
| Date | 8 bytes |
| String | 10 bytes + string length * 2 bytes |
| Variant (a number) | 16 bytes |
| Variant (a string) | 22 bytes + string length * 2 bytes |
| 8 Bits = 1 Byte, 1024 Bytes = 1 Kilobyte, 1024 Kilobytes = 1 Megabyte, 1024 Megabytes = 1 Gigabyte and 1024 Gigabytes = 1 Terabyte. |
Always declare your variables explicit in VBA. If you can add Option Explicit in the top of your module, undefined variables will raise an error. You can add it by default by modifying the preferences for the VBA editor (see Section 2.3). Declaring variables is good coding practice since it reduces the memory requirements and avoid type errors such as
Option Explicit

Dim intCtr as integer

intCtr = 10
intCtr = intCtg + 10
This will raise an error because intCtg is not defined (you have made a typo and meant intCtr). Without Option Explicit the code will run and assume that intCtg is another variable (initialized to zero).
As can be seen a double takes 4 times the memory compared to an integer. That is, you can save memory by considering what data type you need. Consider an example where you have 10000 customer locations on a map and you want to store the distance between customer \(i\) and \(j\). That is, you have to store \(10000 \cdot 10000 = 100.000.000\) numbers. The memory requirements given different data types are:
| Data type | Memory requirements |
|---|---|
| Variant | \((10000\cdot 10000\cdot 16)/1024/1024 \approx 1526\) MB |
| Double | \((10000\cdot 10000\cdot 8)/1024/1024 \approx 763\) MB |
| Integer | \((10000\cdot 10000\cdot 2)/1024/1024 \approx 191\) MB |
If you do not think about memory usage a Variant data type would have been used taking up the double the size compared to using a Double (a decimal number). Moreover, if it is enough to measure the distance using an Integer between 0 and 32767, then we can reduce the memory requirements to only 191 MB. Often the free memory in your computer is around 5 GB, i.e. think about which data type you need!
You declare variables using the Dim keyword:
'' Declare some variables
Sub TM03_DeclareVariables()
    ' Always declare variables in the top of a procedure (memory is allocated)
    Dim intPersons As Integer
    Dim dblAmount As Double
    Dim strText As String

    ' Here we assign values to the variables (modify the memory)
    intPersons = 10
    dblAmount = 27.4
    strText = "Number of persons are "

    MsgBox (strText & intPersons & " which own " & dblAmount & "$")
End Sub
Three variables are declared on the first three lines in the sub (good coding practice). Variables can be of different data types (here an integer, a double and a string). We allocate values to the variables on the next lines and finally output the result in a message box. Note VBA code is case-insensitive, i.e. strText and strtext is the same variable. It is good coding practice to be consistent and often the VBA editor will help you by changing strtext to strText automatically.
2.6.2 Procedures
In VBA we deal with two kinds of procedures: A Sub which can work as a “macro” in Excel, i.e. we can call it using e.g. a button and a Function which can work like Excel functions, i.e. return a value. We already have declared some subs. Let us try to make a function:
'' A function joining two strings
Function TM2_StringJoin(strF As String, strL As String) As String
    Dim strJ As String
    strJ = strF & " " & strL
    TM2_StringJoin = strJ
End Function
First observe that the function have two string input arguments strF and strL. These two strings are joined into one string (saved in the variable strJ) by using the string concatenate symbol &. Finally, the value is returned by assigning the value to same variable as the function name TM2_StringJoin. The function can be called from Excel like any other function by using the function name (have a look at cell D5 in the worksheet TM2).
You may also use all the built-in Excel functions in VBA:
'' Call an Excel function
Sub TM2_ExcelFunction()
    MsgBox ("The sum of cells D9:D12 are " & WorksheetFunction.Sum(Worksheets("TM2").Range("D9:D12")))
End Sub
Note all Excel functions are accessed using the WorksheetFunction object. That is, we write WorksheetFunction.<function name>. VBA also has a set of built-in functions which can be used. For instance the Date and InStr function:
'' Call VBA functions (run it using F5)
Sub TM2_VBAFunction()
    MsgBox ("The current date is " & Date)
    MsgBox ("Jen is found at char number: " & InStr("Hi Jen how are you", "Jen"))
End Sub
We will have a closer look on procedures in Module 4.
2.6.3 Input and output
Input and output are needed to read data and output the result. Examples on input/output are dialog boxes which can be created using MsgBox or InputBox:
Sub TM2_Dialog()
    Dim strName As String

    strName = InputBox("Type your name:")
    MsgBox "Your name is " & strName
End Sub
First, a string is declared. Next, a value is read to the string using an input box. Finally, the result is output using a message box.
You can also write/read values from a sheet using Range or Cells. Note it is always a good idea to know which sheet you are considering by using the Worksheets function:
'' Read and write to sheet
Sub TM2_ReadWriteSheet()
    Dim str1 As String
    Dim int1 As Integer

    Worksheets("TM2").Activate  ' We activate a sheet so know use this sheet
    ' Input values from sheet
    str1 = Range("D4")  ' read cell D4
    int1 = Cells(9, 4)  ' read row 9 and col 4 (cell D9)
    ' Output values
    Range("B7") = str1 & "(" & int1 & ")"
    Cells(8, 2) = str1
End Sub
After declaring variables, the worksheet TM2 is activated and we input/output values using the Range and Cells functions. We will have a closer look on the range object in Module 5.
2.6.4 Conditional statements
Conditional statements execute different instructions depending on a true/false value.
'' Conditional statements example
Sub TM2_CondStatement()
    Dim strName As String
    Dim intAnswer As Integer

    Worksheets("TM2").Activate
    strName = InputBox("Type your name:")
    intAnswer = MsgBox("Do you want to display your name in a message box?", vbYesNo)  ' you can use vbYes and vbNo in your code
    If intAnswer = vbYes Then
        ' Make the message box:
        MsgBox ("Your name is " & strName)
    Else
        ' Write to the sheet:
        Range("B10") = strName
        MsgBox ("Your name is in cell B10")
    End If
End Sub
After declaring variables and activating the worksheet, a dialog box is used for reading your name. Next, based on your answer we use an If/Else statement to do two different tasks. We will have a closer look on conditional statements in Module 3.
2.7 Good coding pratice
It is always a good idea to maintain a consistent coding practice. The main reason for using a consistent set of coding conventions is to standardize the structure and coding style of an application so that you and others can easily read and understand the code. Good coding conventions result in precise, readable, and unambiguous source code that is consistent with other language conventions and as intuitive as possible.
As you already have seen the code in this teaching module has been structured in VBA modules (we use the prefix TM2_ for all modules related to this teaching module). Each procedure starts with a capital letter and we use code indention to read the code easier.
Different ways of naming variables exists (naming convention). Some use snake case others use camel case. The Leszynski naming convention define variables with a consistent prefix that makes it easy to identify its data type. Some common prefixes used for the Leszynski naming convention are:
| Type | Prefix | Example |
|---|---|---|
| Boolean | bln | blnFound |
| Currency | cur | curRevenue |
| Date (Time) | dtm< | dtmStart |
| Double | dbl | dblTolerance |
| Integer | int | intQuantity |
| Long | lng | lngDistance |
| String | str | strFName |
| Variant | vnt | vntCheckSum |
| Array | ary | aryNumbers (optional) |
| Worksheet | wst | wstDistances |
| Workbook | wbk | wbkData |
Many other prefixes can be used also. It is common to use Leszynski convention within the VBA community. A few examples:
this_is_snake_case   # note you do not use capital letters here (not used)
thisIsCamelCase      # you start each word with a capital letter
intAmount            # Lezynski convention naming an integer (int) variable
strFullName          # Lezynski naming a string (str) variable
We adapt the Leszynski naming convention together with camel case. One exception is that we add the suffix TM2_ when we name procedures so that we can easy find procedures related to a given teaching module. When defining variables and functions, it is in general good practice to use nouns for variables and verbs for functions.
It is always good practice to comment your code. Such that others can get a fast overview and understand your code easier. We will use roxygen documentation comments which are widely known. For example in the top of a module file you may write:
'' Module description.
'  Can be more than one line.
' @author Lars Relund <junk@relund.dk>
Before each sub, function etc. write something like:
'' Sub description
'
' @pre Precondition
' @post Postcondition
'
' @param strA   Explanation of input parameter strA
' @param intB Explanation of input parameter intB
' @return Return value (if a function)
' @remarks Further remarks
Function MyFunc(strA As String, intB As Integer) As Integer {
   ...
}
For further details about coding/naming convention see Section D.
2.8 Recap
This module gives a short introduction to VBA:
- A programming language intended to control and automate Microsoft Office applications (we use Excel).
- VBA (Visual Basic for Applications) is an implementation of BASIC developed by Microsoft.
- A compiled language. That is, code need to be compiled first before running it.
- You can only run VBA using the desktop version of Excel (not the web version).
- With VBA you can extend Excel and automate tasks by coding different algorithms that for instance can be run by pressing a button.
It is strongly recommended that you change your language setting for Excel to English, so the menus and Excel functions are in English! On a mac () go to System settings > General > Language & Region and add English as primary language (press the + sign and add it). Note this will affect all your programs on your mac, since this is the way Apple do it. On windows (), select File > Options > Language in Excel and under Office display Language, make sure the display language is English.
For running VBA code the Developer tab needs to be visible in Excel. This can be done by check marking the Developer tab under the ‘Ribbon and Toolbar’ options in Excel. You add it by choosing Excel -> Preferences -> Ribbon and toolbar () or right click a tab and choose Customize ribbon … ().
In the Developer tab you open the VBA editor by pressing the Visual basic button ( Alt + F11, ⌥ + F11).
A few useful shortcuts:
- Toggle VBA editor and Excel ( Alt + F11, ⌘⇧´).
- Run current procedure or continues execution after pausing (F5).
- Auto complete code (Ctrl + Space). On a mac you may have to disable the default shortcut (Ctrl + Space) for switching input sources. You can go to the System Preferences -> Keyboard -> Shortcuts -> Input Sources and disable it.
- Use the debugger and go to next line of code ( F8, ⇧⌘I).
- Switch between subs/functions ( Ctrl + Up/Down, ⌘ + Up/Down).
Basic building blocks in programming:
- Variables store stuff in memory.
- Procedures (functions and subs) execute a set of instructions.
- Conditional statements are used to execute different instructions depending on a true/false statement.
- Loops are used to execute code repeatedly.
- Input/output are needed to read data and output the result.
Variables are used to store information in the program. Think of it as a box that can contain e.g. a number, a string or a date. The variable name is the label on the box.
In VBA we deal with two kinds of procedures: A Sub which can work as a “macro” in Excel, i.e. we can call it using e.g. a button and a Function which can work like Excel functions, i.e. return a value.
Examples on input/output are dialog boxes which can be created using MsgBox or InputBox. You can also write/read values from a sheet using Range or Cells. Note it is always a good idea to know which sheet you are considering by using Worksheets("<sheet name>").Activate.
Conditional statements (decisions) execute different instructions depending on a true/false.
Loops can be used to execute code repeatedly.
Excel functions can be called with the WorksheetFunction e.g. WorksheetFunction.Sum(Range("D2:E5"))
Always remember to save workbooks with VBA code using the file has extension .xlsm and not .xlsx otherwise the VBA code will be removed from the file!
2.9 Exercises
Below you will find a set of exercises. Always have a look at the exercises before you meet in your study group and try to solve them yourself. Are you stuck, see the help page. Some of the solutions to each exercise can be seen by pressing the button at each question. Beware, you will not learn by giving up too early. Put some effort into finding a solution!
2.9.1 Exercise - Hello
Consider the procedure TM2_SayHello in Section 2.4 and modify it into procedure TM2_SayHelloAdv with features:
- Use an input box to ask for your name.
- Output Hello
in cell B11 in worksheet TM2. - Run it using the shortcut F5.
2.9.2 Exercise - Record a macro
Do the following steps:
- Type ‘My name is:’ in cell B12.
- Type you name in cell B13 and activate it (click on it).
- Start the macro recorder and call the macro
TM2_ChangeLayout. - Change the color to blue and font size to 14.
- Stop the macro recorder.
- Activate cell B12 and run the macro.
- Open the VBA editor and inspect the macro.
- Cleanup the macro so only stuff about color and size are maintained.
- Add a button to run the macro.
- Select cells D15:E17 and run the macro.
- Modify the macro in the editor so the font size is 10 and test it.
2.9.3 Exercise - User input
Write a procedure (sub) TM2_CheckNumber that:
- Ask for an integer using an input box.
- Make a message box telling if the number is above or at most 10.
- Write the number to cell B14.
- What happens if you do type in a string in the input box?
2.9.4 Exercise - Max and min number
The worksheet TM2_Numbers contains a button to a procedure that generate 40 random integers in the interval \([-1000,1000]\).
- Create a procedure that use loops and conditional statements to find the maximum number and write it to cell D1. Assign the procedure to button Find max.
- Create a procedure that use loops and conditional statements to find the minimum number and write it to cell D2. Assign the procedure to button Find min.
- Create a procedure that use loops and conditional statements to find the number range (min value and max value) and write it to cell D3. Assign the procedure to button Find range. Given two numbers
m1andm2, you can concatenate them to a string using&e.g."[" & m1 & "," & m2 & "]". - Create a procedure that use loops and conditional statements to count the number of positives and write it to cell D4. Assign the procedure to button Count positives.
It may often be nice to know the row number of the minimum and maximum values.
- Create a procedure that finds the maximum row number and write it to cell D5. Assign the procedure to button Find max row.
- Create a procedure that finds the minimum row number and write it to cell D6. Assign the procedure to button Find min row.
The procedure TM2_RunAll which is already linked to button Run All, runs all the procedures. Have a look at the code and try it out.